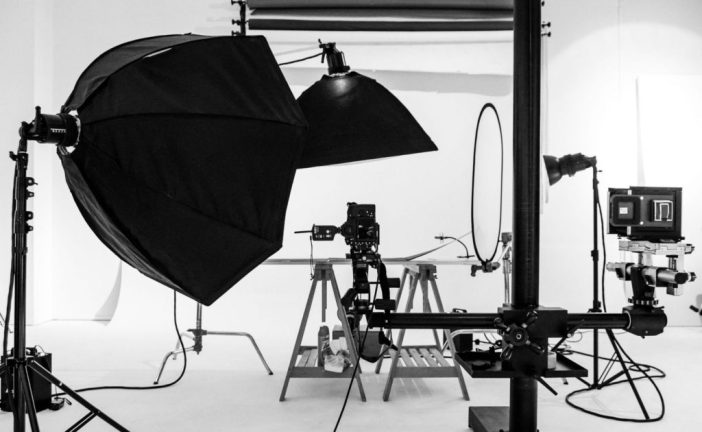
Just for the fun of it, I was at Crisp Contrasts, a commercial studio who represents me as a photographer to try out their Sinar P large format camera. Here is a run through using the studio’s Phase One P45+ medium format digital back.
Photography with the Sinar P and Phase One P45+
Technical cameras
Technical cameras are typically defined as cameras which allow for movements in either or both of the front standard which carry the lens and the rear standards. In a standard box camera, like your typical DSLR or mirrorless cameras, the rear and front standards are fixed in relation to each other. Some medium format cameras, like the Mamiya RB67 ProSD use a focusing method using a set of bellows to move the front standard in relation to the rear. But the front and rear standards remain perpendicular to each other. Technical cameras are designed to allow the planes of these standard to be set at an angle, allowing the photographer to manipulate the focus plane by using tilting or swinging the front standard), or tilting/swinging the rear sensor/film plane to change the image perspective and geometry.

I have been toying with the idea of a large format camera for a while now. I started some experiments with it some years ago. See this article for the first exploration, and the results. In the earlier examples, I used a large format 4×5 (which uses film measuring 4 inch x 5 inch or 9 cm x 12 cm dimensions) Linhof Technica 45 which as a field camera, and two medium format technical cameras capable of shooting film up to 6cm x 9cm dimensions – the Rollei X-ACT2 as a monorail medium format camera, and a Silvestri Bicam as a modern Technical Camera – a hybrid of sorts combining the features of both monorail in a compact field like body. I used a digital back for expediency, as the results can be viewed and examined immediately without having to develop, and scan or print the film.

This ability to manipulate the image makes for creative choices to be made to the photograph. For example, images of a watch with the dial tilted at an angle can be made to be in complete focus from the near side to the far by manipulating the standards of the technical camera. I am also intrigued with the ability to use large film sheets for personal work. Recently, I am attracted to this idea more and more. And am considering the purchase of the most flexible type of technical cameras – the monorail camera. One of the principal candidates for me is the Sinar X. And since the studio which represents me, Crisp Contrasts, have a very similar Sinar P in the studio, I spent an afternoon playing with the camera.

Sinar P, P2 and X
The Sinar P series is premier monorail camera, what many would image as the Rolls Royce of cameras. The camera is made in Schaffhausen, Switzerland. Same city as IWC and Moser. Indeed the venerable late Günter Blümlein was a member of the board at one time. Sinar is an acronym for “Still, Industrial, Nature, Architectural and Reproduction photography”, and tracing its history back to 1879 by Carl August Koch, though it was not till 1948 when his grandson Carl Hans took over the business when the design for a new camera system was patented. This was the Sinar Norma, which became a great commercial success, finding its place in many commercial photography studios worldwide.

In 1970, they released the Sinar P (which I used in this article, though the exact example was probably 8/9 years into the first release). This was a modular large format camera system with a very sturdy monorail system and featured an asymmetric swing and tilt system. Sinar also has a lighter system called the Sinar F – F for Field which is less rigid and does not feature geared movements, and thus not in consideration.
The P series also introduced features such as self-arresting rack and pinion gearing and a precision-engineered quick format change system that allows the photographer to switch between 4×5/5×7/8×10 formats quickly without having to fully disassemble the rear standard. Later, this was to extend to smaller medium formats for digital sensors in the P3. This was accomplished by using a common rear standard bearer and unlocking a single knob to switch among the various format frames. Another new feature implemented in the P series was the Sinar system of calculating swings and tilts as well as the Sinar depth of field calculator, which was a elegant though simple idea that works very well. The Sinar P system was manufactured to very high precision tolerances and were particularly suited in the domain of scientific and industrial photography.

The Sinar P2 was released as an improvement to the excellent P in 1984. The key difference is that the camera was finished in black anodised aluminium instead of silver. But also small ergonomic upgrades were made. Instead of a switch to assign either swing or tilt to the precision geared knob in the P, the P2 now features two separate coaxially mounted knobs for the two distinct functions. The knobs were also covered in a rubberised non-slip texture in place for the smooth plastic used in the P. The P2 clamp now completely encompass the monorail, providing a more stable base. The P2 was succeeded by the P3 in 2002, which was a modification to adapt the camera to the smaller form factor of digital sensors.

In about 2000, the digital imaging world was putting pressure to the commercial studios to switch from analog film photography to digital, much like the pressure put in the watchmaking world by the quartz era in the early 1970s. To cater for this shift, Sinar decided to release a striped down version of the P2 for a much reduced price. This meant giving up some of the rich features of the P2, most notable is the the X dispensed with the luxury of the P2’s metering back system, and used a simpler ground glass carrier with film carrier.

Sinar also advertised that the X could not be used as the base for upgrade to larger formats by just changing the format frames. In practice, this can be done, albeit not without tools (screwdriver) as it could with the P2. The frame carriers also do not carry the zero detent markings for the various formats, but these can be easily marked by hand. In addition, the useful zero detents have been removed. It is still possible to zero all the controls, but without the detents, the frames will not snap into the zero locations easily. This might actually be an advantage for smaller formats, as it will be easier to set the movements close to zero, without unintentional zeroing. To differentiate the P2 from the X, the left and right shift wheel on both front and rear standards are red instead of black. In practice, the P2 and X are functionally almost exactly the same camera.
Setting up for a watch shoot
The Sinar P was mounted on a very rigid studio stand which allows precise positioning of the very heavy camera. And the setup is with a Schneider Kreuznach Sironar N 210mm/f5.6 lens in a Copal 1 shutter. in 4 x 5 format, the 210mm is considered a long normal lens, similar to say 70mm on a 35mm full frame format system. Another common normal lens is the 150mm, the equivalent to about 50mm in full frame. The ground glass is removed from the rear standard, and in its place, we used a Kapture Group digital adapter for Hasselblad V backs. This simply clips on to the Graflok back and provides a sliding configuration. As seen below, on the right is the standard Hasselblad V waist level finder as the viewing unit and on its left, the Phase One P45+ digital back as the sensor unit. This configuration is described in a blog post by Crisp Contrasts.

The sensor unit and the viewing unit can slide left to right on precise and rigid rails to view the image on the ground glass for composition, and for exposure. The workflow is quite lengthy and involved, with no mechanical interlocks. Get one step wrong, and there will be no photograph. Here are the steps:
- Zero all the settings on the Sinar P. This is made a bit easier as all the settings on the Sinar P have a detent at zero position, and easily snaps into place.
- Open the shutter, this is done by a small switch by the side of the lens. Open the aperture to full so as to get more light to the ground glass of the Hasselblad V WLF to ease focusing.
- Attach the shutter release.
- Attach the flash sync cable from the X port of the lens to the back of the Phase One sensor.
- Attach the flash sync cable from the sensor to the flash system.
- Attach the Phase One P45+ digital back by the Firewire 800 cable to the computer which is running Capture One as the tether system.
- Adjust the standards using the coarse focus to roughly get the image in focus. I also adjusted the entire camera to tilt down to look at the watch.
- Use the fine focus on the rear standard to focus on the furtherest part of the watch that I want in focus. This is at the top (12 o’clock position on the dial) of the CasiOak used as a subject. The image on the ground glass is upside down and left-right inverted, so this is found at the bottom center of the viewfinder.
- Use front tilt to make the nearest part (the 6 o’clock position on the CasiOak dial) of the watch to be in focus. This process is done through the ground glass, with the Hasselblad’s WLF magnifier. If I had a more modern digital back with live view and focus peaking, this task is even easier, as I can magnify the image on the digital back or the tethered computer screen to zoom in to ensure that the portion of the image is in focus. But the Phase One P45+ is a CCD sensor which is more than a decade old. It works beautifully in the studio conditions, just like my Hasselblad H3D-39, but shows its age when it comes to convenience and higher ISO settings.
- Go back to the first focus point and adjust the fine focus. If it needs to be moved closer to the front standard to focus, we have not applied enough tilt. If it needs to be moved further, then we have too much tilt. Go back to the second focus point, and adjust accordingly. This process is iterative, and theoretically, perfect focus is achieved with infinite tries, but in practice, this is usually accomplished in three iterations.
- The Sinar has asymmetric tilts, where the tilt axis is not at the center axis. And the process is simpler. We begin by placing the first focus point at this axis, the entire iteration is done once we have tilted the lens to achieve focus at the second point. This is because the focus on the first point is not shifted as it is on the tilt axis. However, I did not use this, as the ground glass is marked for 4 x 5 film, and the digital sensor, being much smaller needs for the standards to be re-calibrated. Sinar provides the P3 with the standards which are smaller and calibrated for this purpose. But this can also be accomplished with some legwork to mark out the smaller digital sensor on the ground glass.
- When the desired focus is achieved. The image can be recomposed by using the shift and rise/fall of the rear standard to get the composition required. This will not affect focus.
- Then, slide the viewfinder over, so the sensor is now exactly at the same spot as the viewfinder was. This precision is easily achieved by the Kapture One adapter.
- Close the shutter.
- Meter the scene. If flash is used, a flash meter is used to measure the light coming from the flashes.
- Set the appropriate aperture and shutter speed.
- Release the shutter once. This wakes up the digital back.
- Release the shutter a second time. This has to be done within 5 seconds of the fits,Pvt and releases the shutter to make the exposure.
- The image appears on the computer as a raw file.
- Edit the image as per normal.

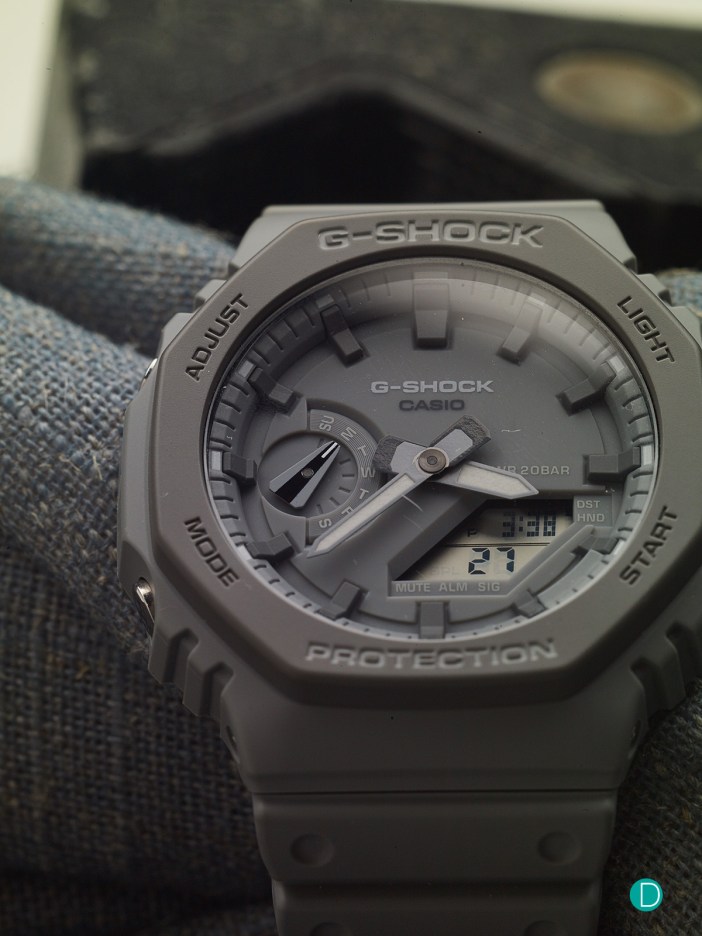
And the result.
The framing is a bit off, I should have shifted the rear standard a bit more. And the watch has a scratched crystal with some dust on it…but its a well worn and loved CasiOak. This was shot at f/8, but almost the entire dial is fully in focus, due to the tilt applied to the front standard. The Scheimpflug principle is in play, enabling the entire dial to be in sharp, crisp focus. If a regular camera is used to capture this image, to develop this depth of field on a medium format sensor would need at least f/22 or smaller aperture. At this aperture, the lens-sensor system will display some level of diffraction which is visible as softness in the image.

Is it worth it? The process is painfully slow, but allows for a contemplative approach to photography. And the same camera can be used with 4 x 5 sheet film for very large negatives or positives. These are very high resolution, and can be scanned or wet printed to produce very large prints. In all, a fun exercise. Especially for the photography nerd. So, shall I buy the Sinar X which is currently available in the used market in Singapore? I am still deciding, but if I do, I will write another review of the system.
For now, let us know in the comments if you have used a large format camera before, and if yes, have you shot watch macros with it.


5 Comments
Great article Peter!
My experience with a SINAR F2 (and Nikon large format lens) is limited to table top photography (no macro photography). My best experience with macro photography is however with 36mm. The combination with a Nikon PB4 bellows and a Schneider Kreuznach 50mm enlarger lens gave great results.
Large format photography with all its steps can be very de-stressing in a hectic world. But I think one must have and take the time for it.
My compliments for the great articles on deployant.com. A joy to read everyday!
Kind regards
Eugenio
Thank you very much Eugenio. I am not considering the Sinar F because it is designed to be light and usable in the field, thus does not come with geared movements which I think will be handy for macro work.
Of course, I will also attempt to cary this huge camera outdoors, if I do buy one, to do architecture and interior photography, which is a personal interest of mine. I am also thinking of doing a project of watchmaker portraits of those who visit Singapore, and are available to sit for a session. For these personal projects, I am thinking of shooting in 4×5 film.
Excellent article Peter! Especially on the benefits of tilt (shift). Your studio is both beautiful and impressive. Thanks for taking the time, and effort, as it is challenging.
Thanks Steven!
Pingback: Photography with the Sinar P and Phase One P45+ – Horopedia.ch